Gerard Gauvin's "Calypso"
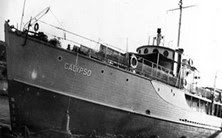
The Calypso
"Calypso" was one of the 561 ships ordered by the British Navy at the start of the Second World War, was baptized under the first registration number BYMS 26 (British yard Minesweepers) and joined the Royal Navy on August 20, 1942. This dragger was based in the port of Taranto in Naples (Italy) and was decommissioned in 1946. After the Second World War, it provided a ferry service between Malta and the island of Gozo and was renamed after Calypso, whose mythological island of Ogygia was associated with Gozo. Commander Jacques Yves Cousteau, returning to France after being exiled with his family in the 1920s in the United States, joined the French naval school in 1930 aboard the training ship the Jeanne D'Arc to train as an officer. and learned the harsh trade of navigation by participating in numerous war events. Commander Cousteau became the owner of the boat in 1950 following meetings and interventions by honorable people for the symbolic sum of one franc per year to carry out his project of transforming it into an Oceanographic ship. After 9 months in the Antibes shipyards, he emerged in 1951 with modern technical equipment worthy of the name for his research.
Construction
I chose the 1/200 scale which allows me a lot of detail, the ship will therefore be 21 cm long and approximately 4 cm wide.
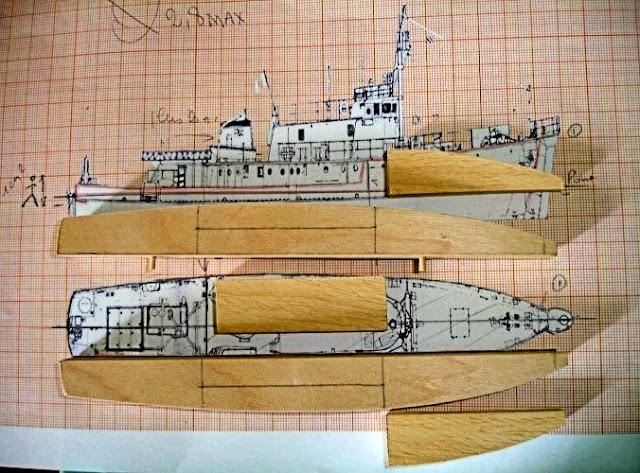
The 3-liter bottle measures 43 cm in length: (30 cm in body and 13 cm in neck), and has the particularity of being equipped with 3 slightly rounded faces measuring 12 cm on each side, ensuring good stability when placed on the surface. of work. The neck offers a 2.8cm diameter opening. It will be necessary to provide transverse beams to support the sea, which will be made of wood. Armed with a profile plan, front and top of the ship, obtained from websites.
I import the Calypso plan into my drawing software and adjust its proportions on a digitally measured layer to match the measurements previously taken inside the bottle. The space/volume of the diorama leaves no room for the unexpected. Everything must be scrupulously studied in advance. After this process I was able to print the plan and I started by tracing the two half-shells seen from above, 2 cm wide, on a wooden board (samba) 1 cm thick.
I used the limits of my computerized plan as a guiding axis. After being cut, the two pieces are assembled using fitting means. I checked the correct disassembly and left the dowels glued on one side and the corresponding holes on the other. The layout of the two half-decks was identical to the hull, but they were cut from a 2 mm thick sheet of plywood. Adjusted and glued to the hulls, they guaranteed good rigidity. The central element, which serves as the living space and the bow block, was also cut in two, lengthwise and glued together. They were covered with 2 mm thick plywood.
All parts were fixed with dowels to facilitate assembly. I traced the half-parts of the hull, starboard and port, on cardboard, like Canson and adjusted them to the curvature.
I measured the spacing of the struts leading to the cabin and cut a small notch into the edge of the upper and lower decks. I cut each struts from 0.5mm diameter piano wire that I glued in place. With the half-hulls fixed, I was careful to glue only the top part and leave a 3mm protrusion on the side of the hull. The objective was to hide the joints between the hull and the deck.
Then it was necessary to cover the decks with smooth white Bristol paper, first tracing the floor planking with a thin, hard pencil to avoid burrs. The half-shells and flat edges were glued into their respective positions.
Using the computerized plan, I also made the front and rear cabins in wood, lined them with Canson paper and designed the windows, access doors, portholes and floor.
The railings for the parapets were made using cotton thread using a mold. Each section was glued with liquid white glue and after drying, it was separated with a scalpel and placed in the ship.
Calypso's diverse and specific devices, such as the landing platform, the small helicopter, the exploration bathyscaphe, were made with cardboard, cotton thread, plastic tube and other recycled materials.
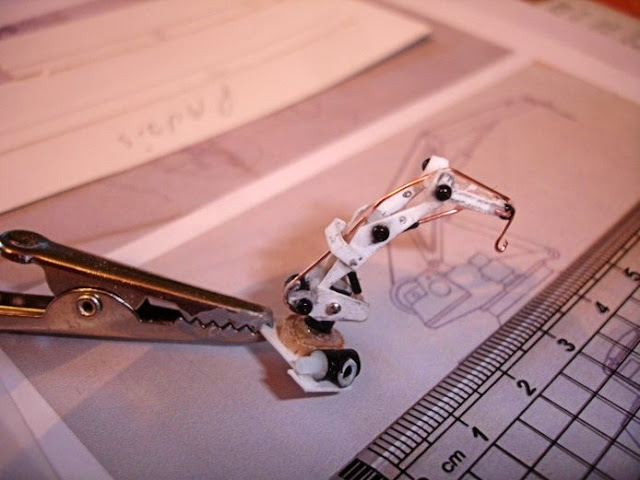
The rear crane that allows the launch of the exploration bathyscaphe or the anti-shark cage was a personal design, according to the photographs. The hull, chimney, hardware and all other elements that make up the "Calypso" were then painted.
Painting of the hull, chimney, hardware and other components
The ship came to life after adding small characters, 24 in total. Commander Cousteau wears his famous red cap (we can see him climbing the starboard ladder), as do 9 divers, equipped with swimming fins and masks! Air bottles are made from telephone wire sheath. All of these figures measure 8.5mm tall, to respect the construction scale, and are made from electric coil wire coated with acrylic paint to give them the desired volume and shape.
After checking possible placements, I installed some small crew figures at the rear of the ship. This way, they were able to pass through the bottleneck without any problems, which avoided the need to perform acrobatic exercises to place them inside the bottle with tongs.
Without a doubt, I also saved some characters from falling into the waves, condemned to certain death!
We noticed the figures of Commander Cousteau, with his red cap and his companions, drying themselves. The stern has the name of the boat.
The sea
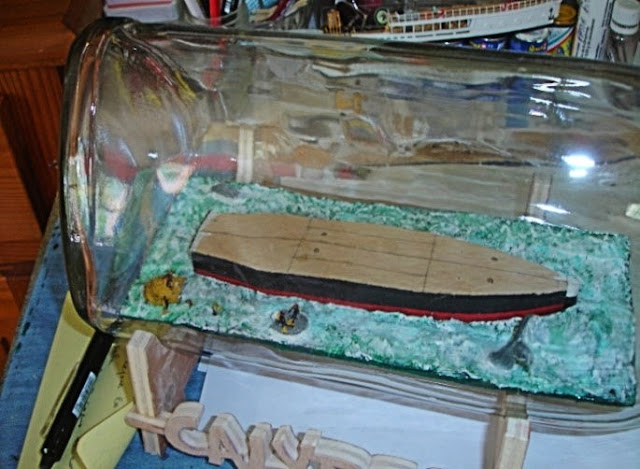
We have all tried different ways of making the sea, in a bottle. We used putty, silicone, cardboard strips, etc., without finding the miracle recipe. With experience, I chose wood that is more easily worked as intended. The cardboard template is the base, it also allows you to carefully measure the surface occupied by the sea inside the bottle and adjust it if necessary. So I traced the perimeter of the hull with a pencil, then carefully cut out the location of the boat, leaving just enough to sail without too much slack. I then transferred the drawing to a 5mm plywood board that I glued to the cardboard and cut into 4 parts lengthwise. I mounted it with adhesive tape underneath to prevent them from separating. This way, these parts can pass through the bottleneck, one after another, without problems. The waves are made with a mixture of small pieces of paper towel and white glue slightly diluted in water. A first coat of midnight blue acrylic paint adds depth. The harmony of colors, green, white, sienna and turquoise blue in small touches will create a sea worthy of the name. A layer of glossy transparent varnish over the entire surface gives relief. Without waiting for it to dry, I painted the crest of the waves with an ivory white, the contact with the varnish left small bubbles perfectly imitating the foamy waves.
I removed the tape from the longitudinal blocks of wood and, underneath, slid the blade of a scalpel between each slice. With extreme caution, I gave slight oscillations along the entire length to separate the 4 elements. The tip of the blade thus pierced the surface of the sea. This method considerably limits the risk of seeing the junctions of elements.
Scenic elements
I imagined Calypso next to humpback whales. These friendly creatures were made with polymer clay, placed in the oven for 10 minutes on the thermostat at 100°. After drying, I painted them bluish gray, some varnished cotton pins in the head for one, in the tail for the other. I place them in the sea for identification in their aquatic environment. Only the tail takes place and gets stuck in the sea. With a fine brush I make white marks on the cotton. The illusion of running water is perfect.
The bathyscaphe and some divers can also participate in the encounter with marine mammals, in addition to the semi-rigid one that advances cautiously!
The big test
Testing the positioning and placement of the elements that will make up the Calypso and its environment outside the bottle, inside the bottle, is essential before bottling, because unexpected problems always arise for which we must be prepared. Therefore, training in assembly and disassembly is necessary so that problems do not occur inside the bottle. This operation is repeated several times to ensure safe maneuvering.
Bottling process
The bottle rests on its construction cradle, which will become a presentation cradle at the end of assembly. The faces of the bottle are curved, it is necessary to glue 4 beams to support the ocean and the bottom of the boat horizontally. After the platters were glued together, I placed the sea elements, which I positioned precisely and which I also glued together.
With one of the rods that support the umbrella fabric, equipped with a flat brush, I make some touches, with ivory white paint and glossy varnish, in the cuts between the strips so that the scars disappear perfectly from the sea surface. Two “half shells” to position the ship are positioned with the precious help of the docking system.
The port deck goes in first, glued and inserted into the corresponding holes in the hull. The one on the starboard side joins it without any problems, the result of precise prior work.
I delicately placed and glued the winch and machinery under the rear platform with my "homemade pliers”. I also did this with the helicopter and the smokestack. Using contact glue, I placed some sailors here and there. This operation would be more delicate Afterwards, I placed the first element of the cabin and the bridge. The installation of antennas, flags and radars were also glued with precision to their roof.










Comentários
Enviar um comentário